> ## Documentation Index
> Fetch the complete documentation index at: https://help.reevo.ai/llms.txt
> Use this file to discover all available pages before exploring further.
# Workflow Builder in Reevo
> Workflows let you automate business processes by triggering actions whenever specific events occur, all without writing code.
## Overview
Reevo's workflow builder lets you automate repetitive tasks and create sophisticated business processes without writing code. Set up workflows that trigger automatically when specific events occur - like a record being created, an opportunity being updated, a meeting starting, a webhook being received, or a recurring schedule reaching its next run time - and execute a series of actions like updating records, routing leads, waiting, branching, or sending notifications.
Workflows consist of two main parts: a **trigger** that starts the workflow automatically, and **action nodes** that execute in sequence to complete your business process.
***
## Prerequisites
* **Admin or User role** with permission to create workflows in your Reevo workspace
* Familiarity with the records and data you want to automate (Contacts, Accounts, Opportunities, etc.)
***
## Creating a New Workflow
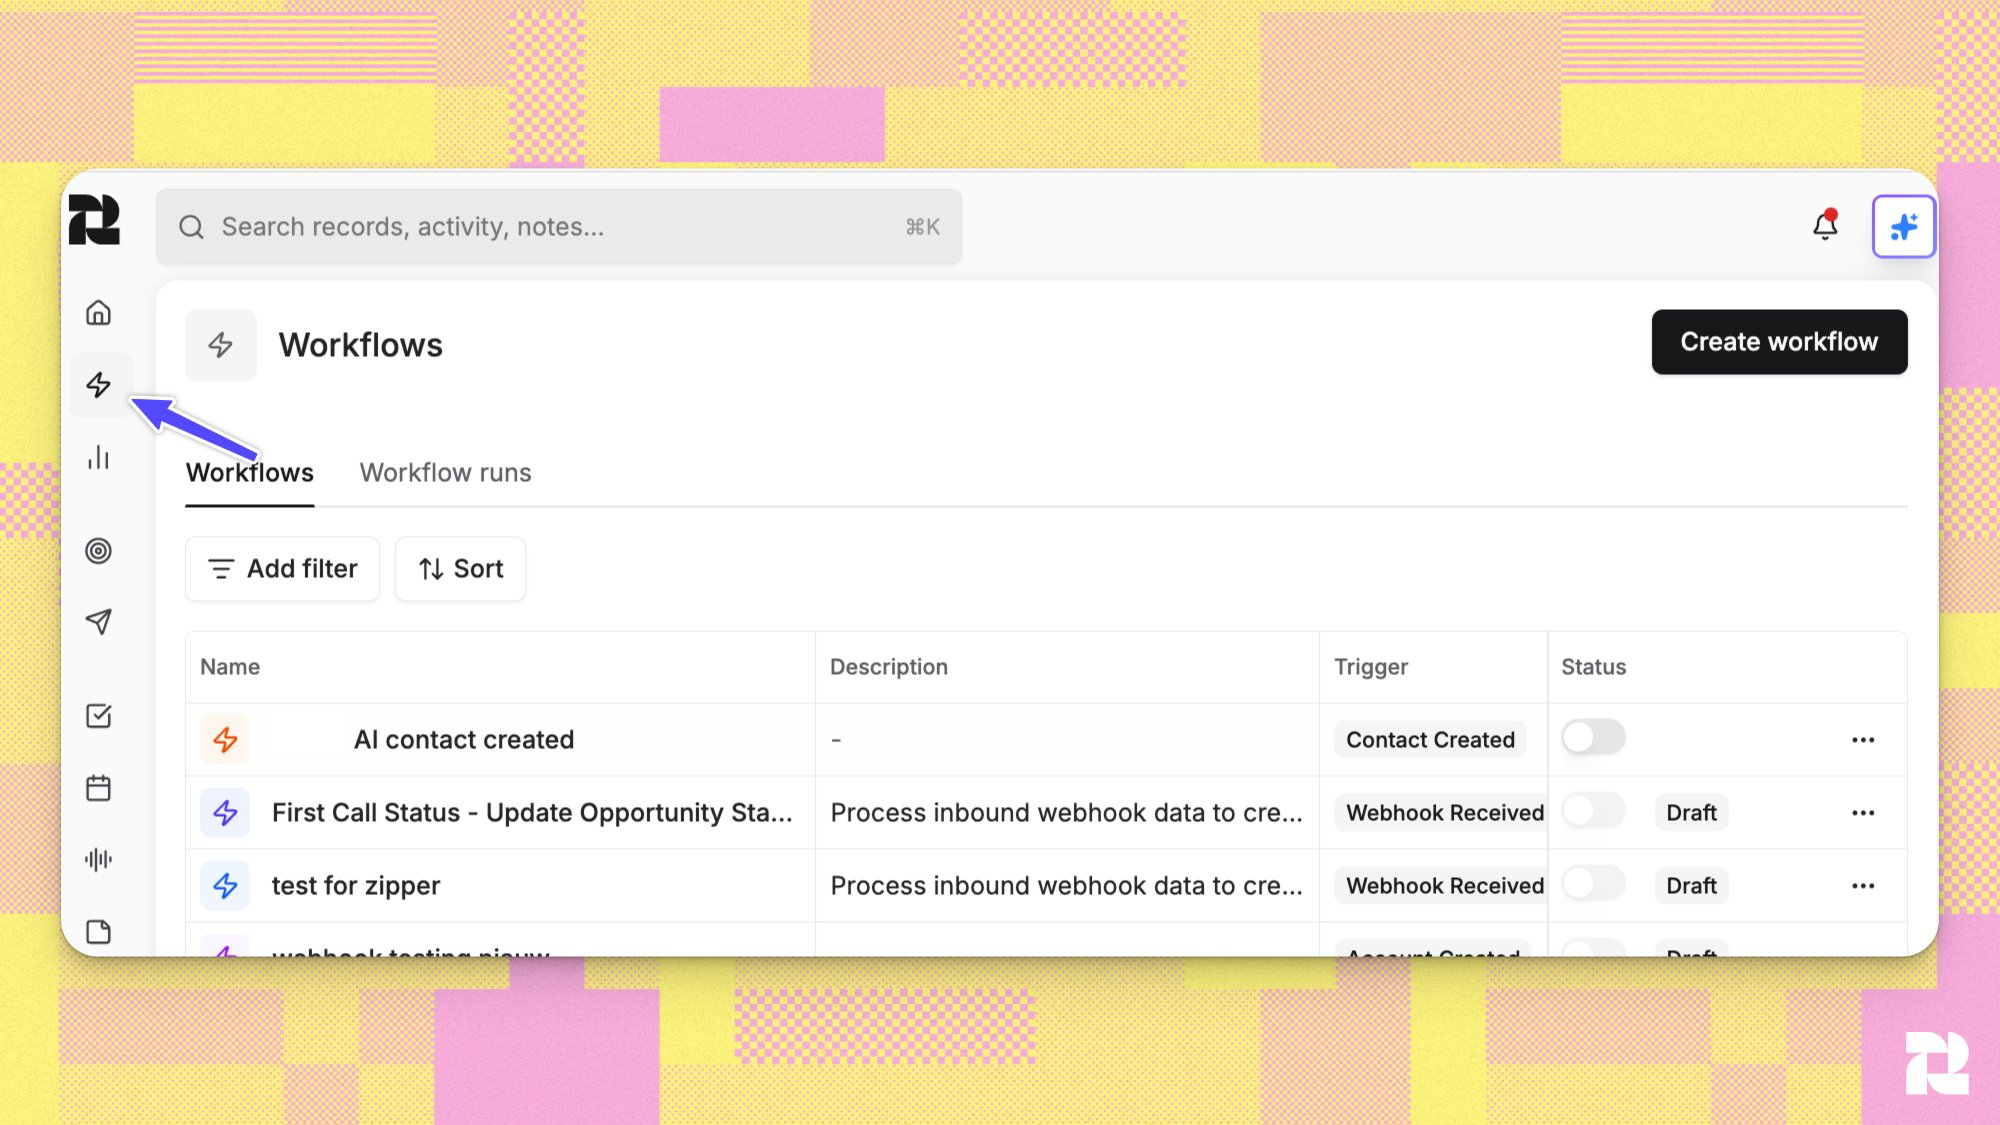
### Step 1: Navigate to Workflows
Access [Workflows](https://app.reevo.ai/workflows) through the navigation bar.
 ### Step 2: Choose a Template or Start from Scratch
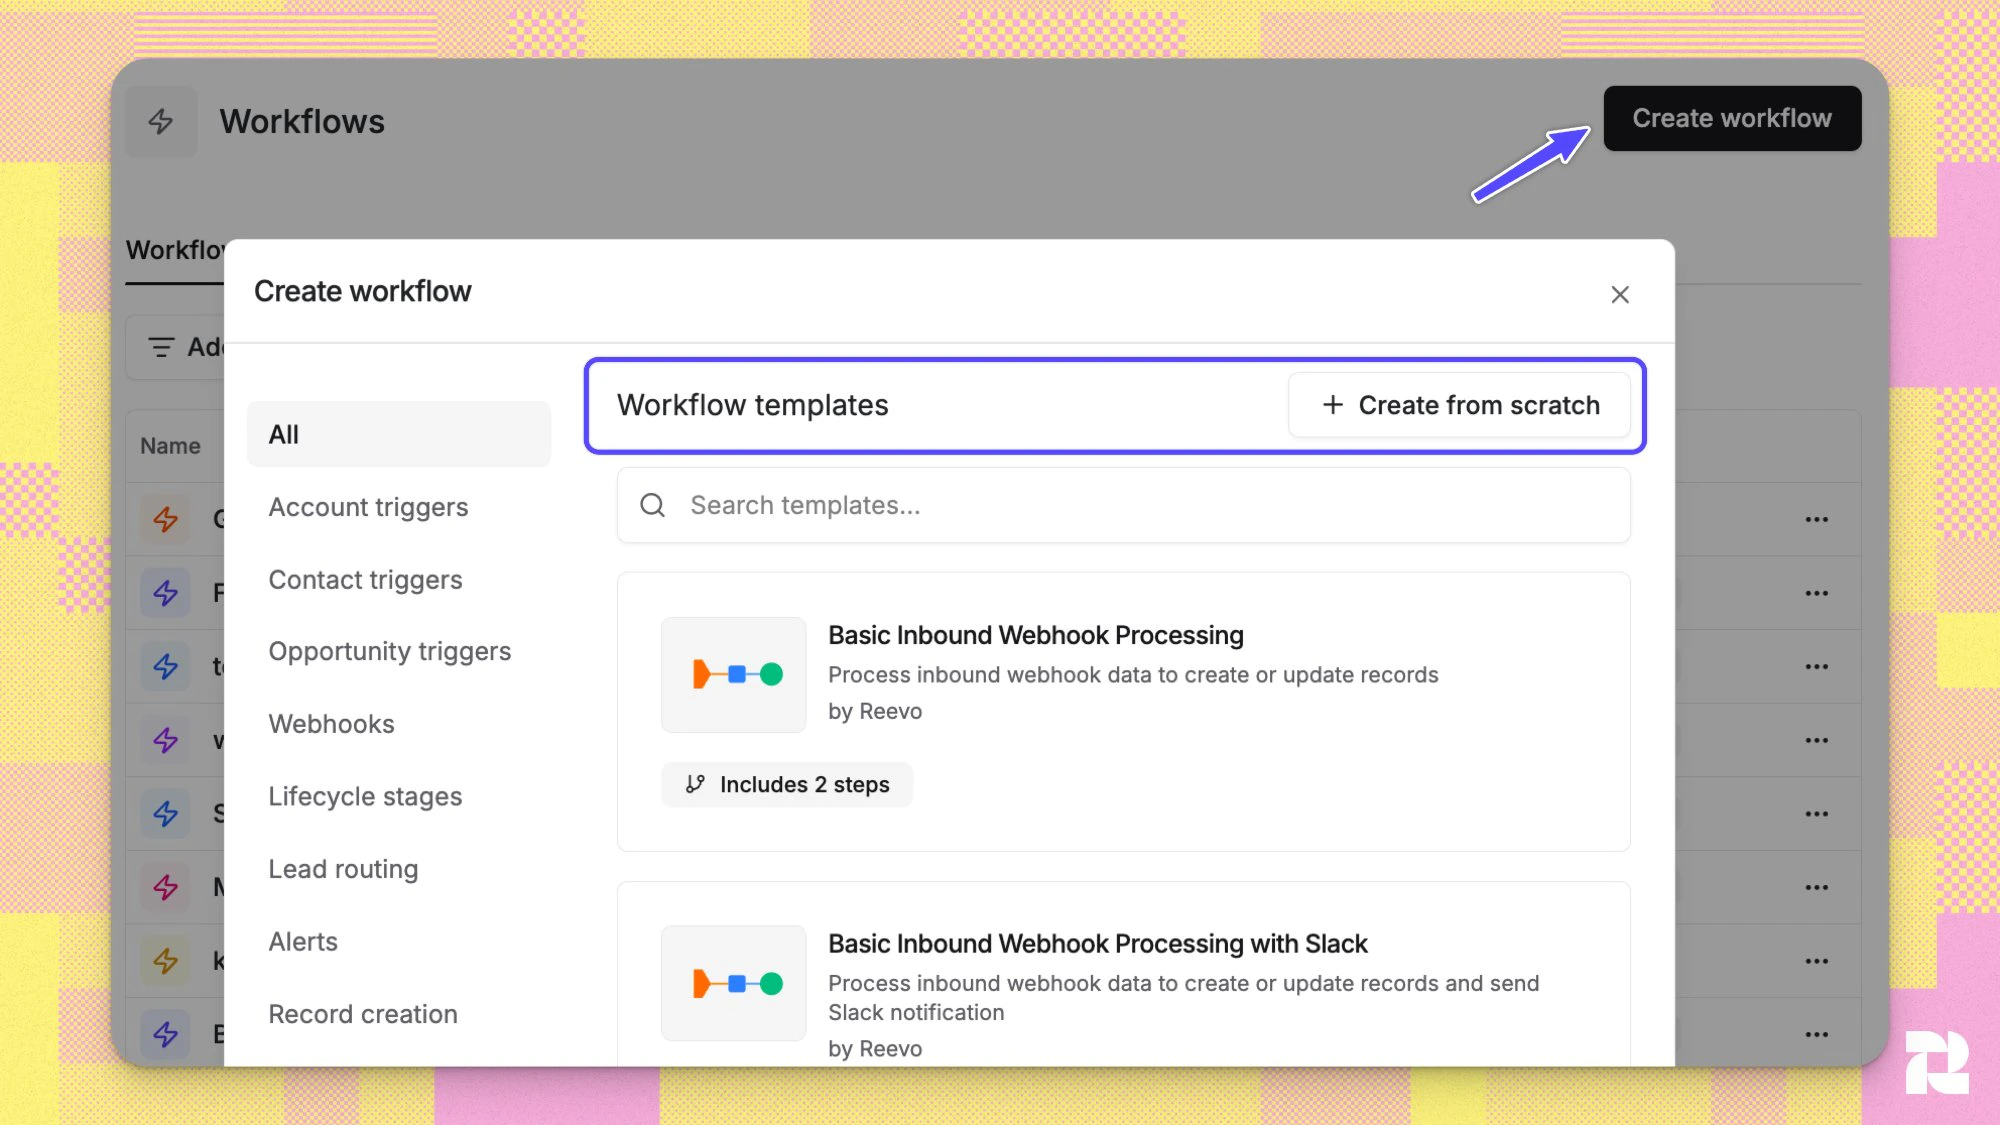
Select a template that matches your use case, or build your own from scratch. Templates are organized by category - Contact-Based, Account-Based, Lead Routing, Alerts, and more.
See [Workflow Templates: Choosing the Right Starting Point](/Automations-and-Workflows/Workflow-Templates) for a breakdown of each category.
Give your workflow a clear, descriptive name so it's easy to identify later (e.g., "Closed Won New Business Opportunity → Create Renewal Opportunity").
### Step 2: Choose a Template or Start from Scratch
Select a template that matches your use case, or build your own from scratch. Templates are organized by category - Contact-Based, Account-Based, Lead Routing, Alerts, and more.
See [Workflow Templates: Choosing the Right Starting Point](/Automations-and-Workflows/Workflow-Templates) for a breakdown of each category.
Give your workflow a clear, descriptive name so it's easy to identify later (e.g., "Closed Won New Business Opportunity → Create Renewal Opportunity").
 ### Step 3: Build in the Editor View
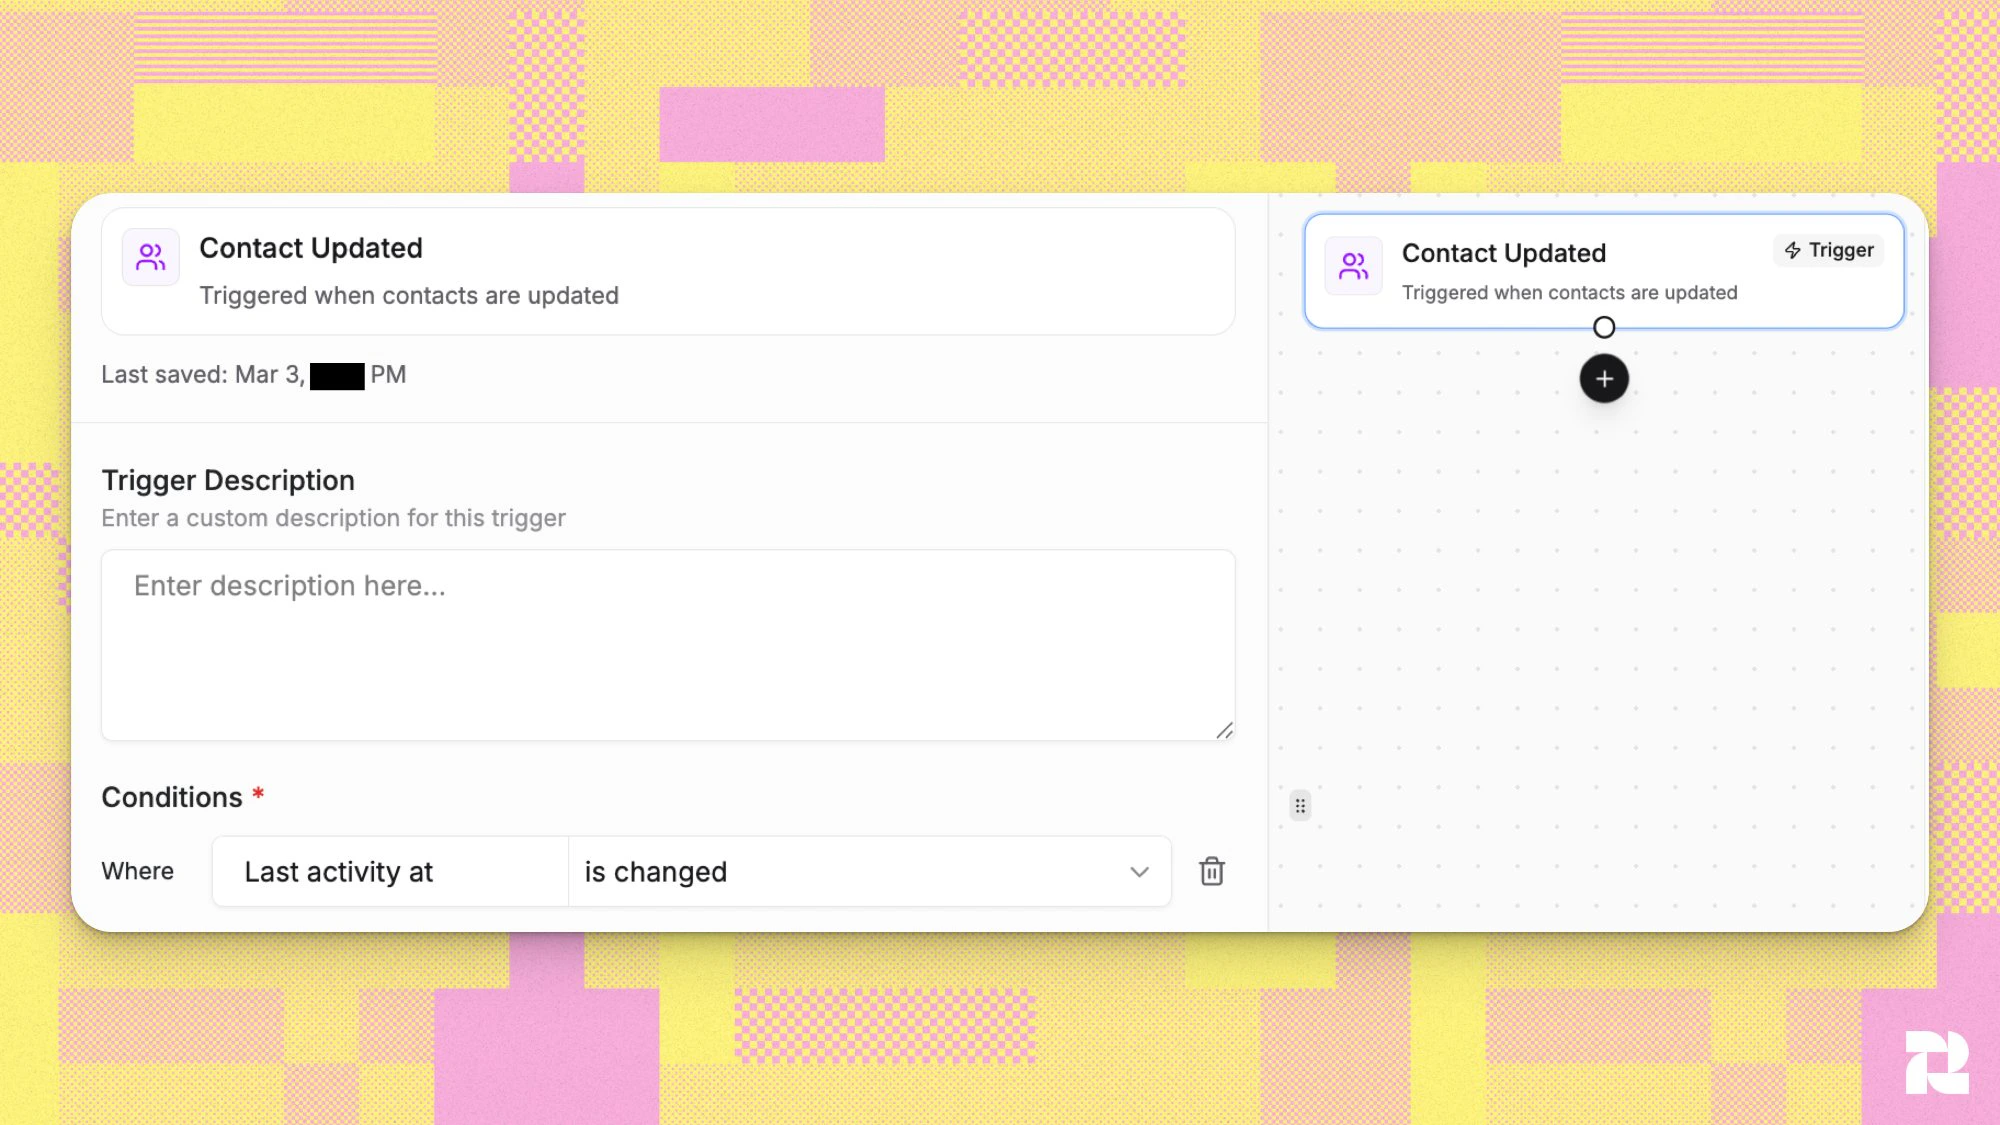
You'll land in the **Editor** view, where you can see and configure every node in your workflow.
The workflow flows top to bottom:
1. **Trigger node** - the special first node that defines the event that starts the workflow and provides relevant data to downstream nodes (e.g., when an account or contact is updated)
2. **Action nodes** - the steps that execute after the trigger, defining what the workflow does in sequence
Click any node to open its configuration panel on the left. Follow the **Deploy Checklist** - it lists every required field that must be filled in before you can deploy.
***
## Configuring Your Trigger
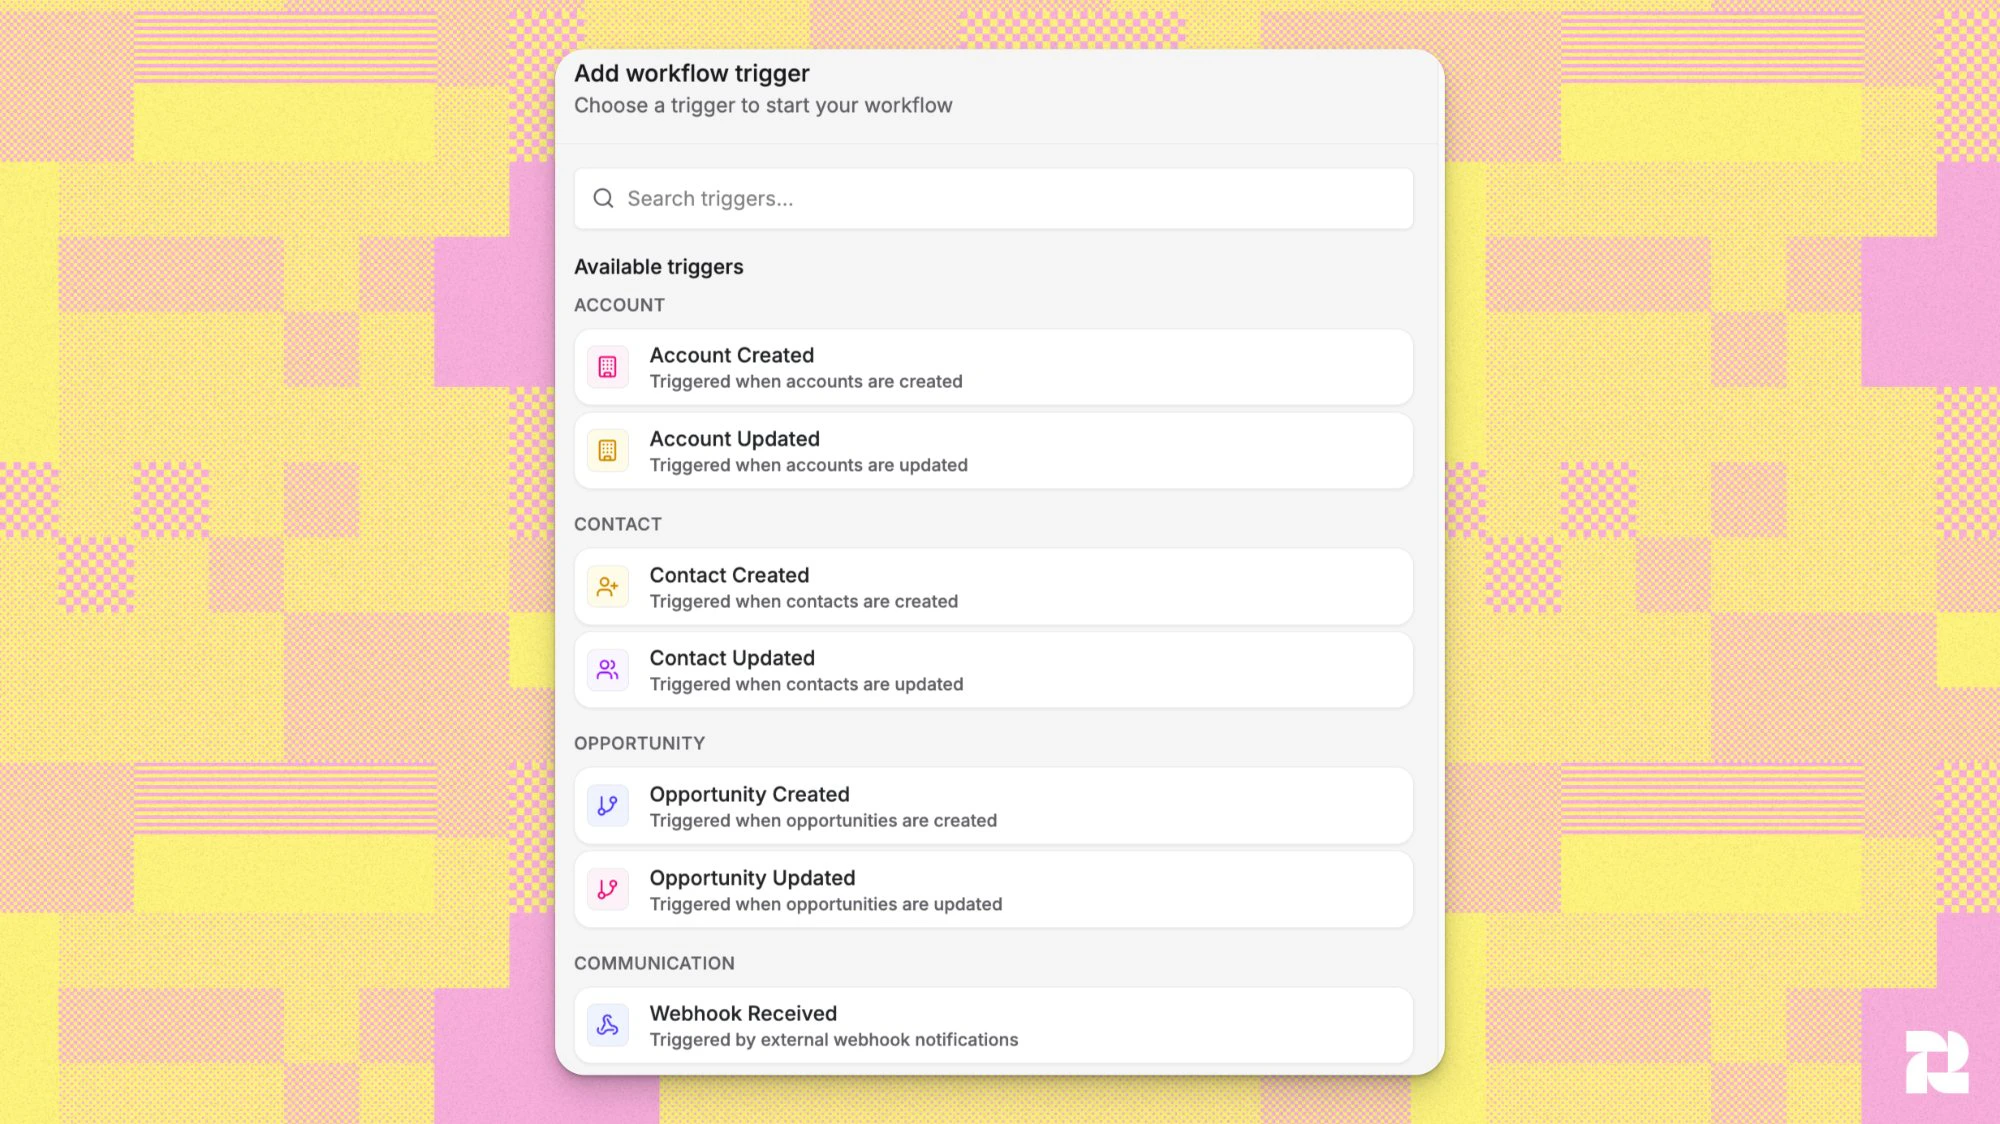
Click the trigger node to select your trigger type and configure its settings. Released trigger categories include:
| Category | Example triggers |
| :------------------------------------ | :------------------------------------------------------------------------- |
| **Account, Contact, and Opportunity** | Account Created, Contact Updated, Opportunity Created |
| **Meetings** | Meeting Created, Time Before Meeting Start, Meeting Started, Meeting Ended |
| **Schedule** | Recurring Schedule |
| **Communication** | Webhook Received |
| **Custom object records** | Custom Object Created, Custom Object Updated |
See [Understanding Workflow Triggers](/Automations-and-Workflows/Workflow-Triggers) for the full list of trigger types and configuration details.
### Step 3: Build in the Editor View
You'll land in the **Editor** view, where you can see and configure every node in your workflow.
The workflow flows top to bottom:
1. **Trigger node** - the special first node that defines the event that starts the workflow and provides relevant data to downstream nodes (e.g., when an account or contact is updated)
2. **Action nodes** - the steps that execute after the trigger, defining what the workflow does in sequence
Click any node to open its configuration panel on the left. Follow the **Deploy Checklist** - it lists every required field that must be filled in before you can deploy.
***
## Configuring Your Trigger
Click the trigger node to select your trigger type and configure its settings. Released trigger categories include:
| Category | Example triggers |
| :------------------------------------ | :------------------------------------------------------------------------- |
| **Account, Contact, and Opportunity** | Account Created, Contact Updated, Opportunity Created |
| **Meetings** | Meeting Created, Time Before Meeting Start, Meeting Started, Meeting Ended |
| **Schedule** | Recurring Schedule |
| **Communication** | Webhook Received |
| **Custom object records** | Custom Object Created, Custom Object Updated |
See [Understanding Workflow Triggers](/Automations-and-Workflows/Workflow-Triggers) for the full list of trigger types and configuration details.
 Broad update triggers can run very often. Configure filter conditions so the workflow only fires for meaningful updates.
 ***
## Adding and Configuring Action Nodes
Click **+** at any point in the workflow to add a new action node. Released node categories include:
| Category | Nodes |
| :------------------------- | :------------------------------------------------------------------------------------ |
| **Account** | Create Account, Update Account, Search Account, Move Account Stage |
| **Contact** | Create Contact, Update Contact, Search Contact, Move Contact Stage |
| **Opportunity** | Create Opportunity, Update Opportunity, Search Opportunity, Move Opportunity Stage |
| **Custom object records** | Create Custom Object Record, Update Custom Object Record, Search Custom Object Record |
| **Sequences** | Sequence Enrollment, Sequence Unenroll |
| **Communication** | Send Slack Channel Message, Send Slack DM to User |
| **Logic and flow control** | Condition, Compute, Delay, User Round Robin |
| **Integrations** | Webhook |
For a full explanation of every available node, see [Workflow Action Nodes: Complete Reference](/Automations-and-Workflows/Workflow-Action-Nodes).
***
## Undoing and Redoing Changes
While editing a workflow in **Draft mode**, you can undo and redo changes using the controls in the canvas toolbar or keyboard shortcuts.
| Action | Mac | Windows |
| :----- | :-------------- | :--------------------------- |
| Undo | Cmd + Z | Ctrl + Z |
| Redo | Cmd + Shift + Z | Ctrl + Shift + Z or Ctrl + Y |
The undo and redo buttons in the canvas toolbar appear disabled when there is nothing left to undo or redo.
Changes tracked include: adding or deleting a step, updating a step's configuration, updating the trigger, adding or removing a connection between steps, swapping or moving steps, and cloning a step.
When you undo or redo, the builder automatically scrolls the canvas to the affected node and opens its configuration panel.
Undo/redo is only available in **Draft mode**. Switching to production view or deploying a new version clears the undo history.
***
## Using Variables
Variables let you pass data from one node to another, making your workflow dynamic and responsive to the actual records being processed.
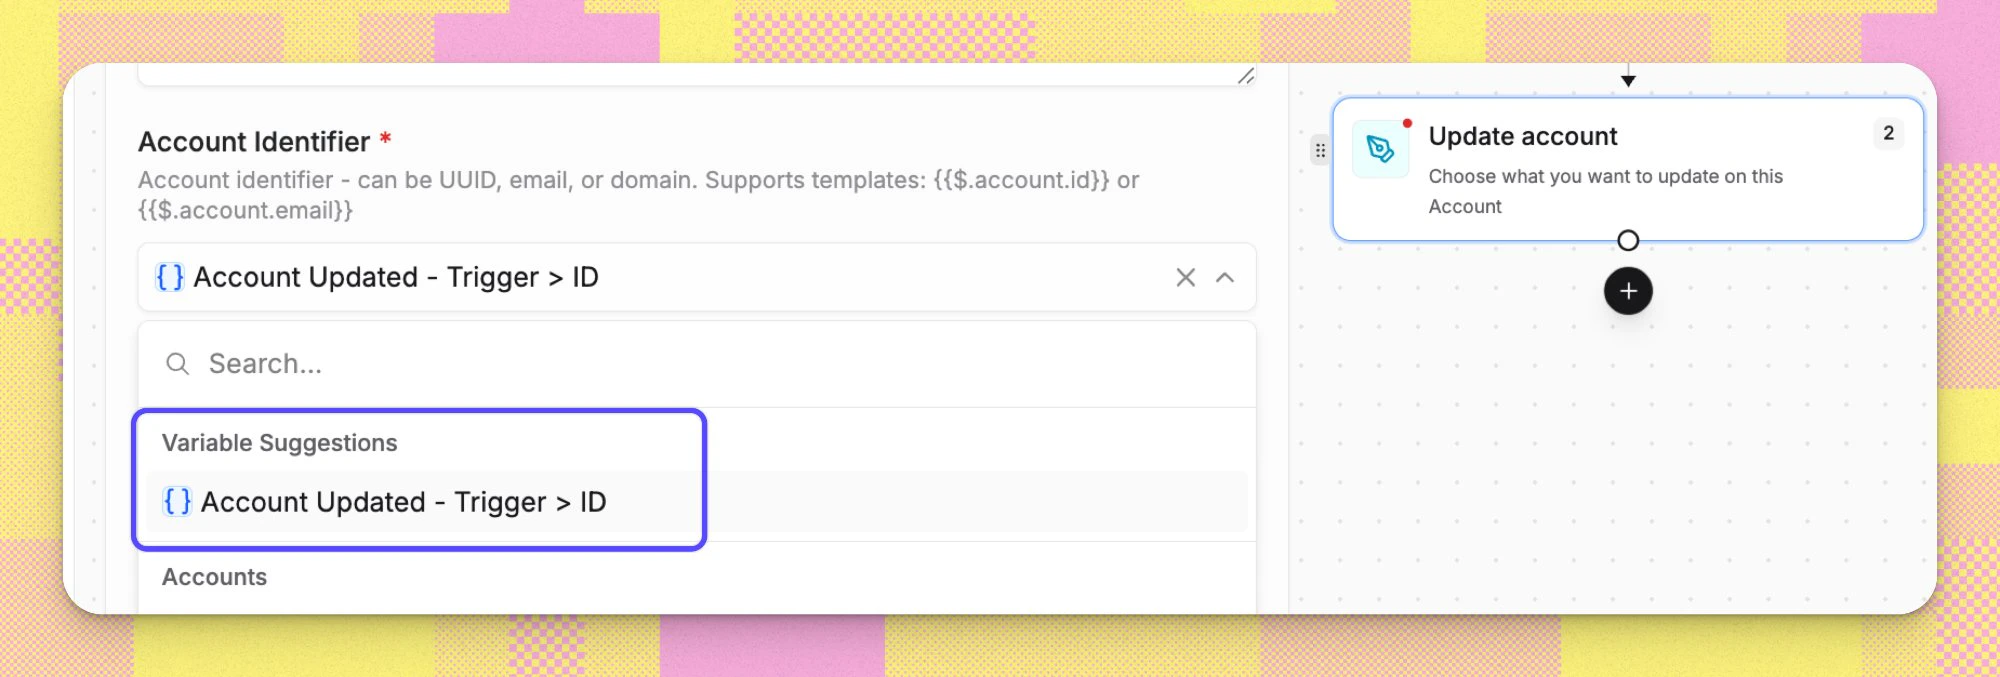
When configuring an action node's fields, click any field to switch to **variable mode** to see all data available from earlier steps - the trigger record's fields, outputs from previous action nodes, and internal workflow values.
***
## Adding and Configuring Action Nodes
Click **+** at any point in the workflow to add a new action node. Released node categories include:
| Category | Nodes |
| :------------------------- | :------------------------------------------------------------------------------------ |
| **Account** | Create Account, Update Account, Search Account, Move Account Stage |
| **Contact** | Create Contact, Update Contact, Search Contact, Move Contact Stage |
| **Opportunity** | Create Opportunity, Update Opportunity, Search Opportunity, Move Opportunity Stage |
| **Custom object records** | Create Custom Object Record, Update Custom Object Record, Search Custom Object Record |
| **Sequences** | Sequence Enrollment, Sequence Unenroll |
| **Communication** | Send Slack Channel Message, Send Slack DM to User |
| **Logic and flow control** | Condition, Compute, Delay, User Round Robin |
| **Integrations** | Webhook |
For a full explanation of every available node, see [Workflow Action Nodes: Complete Reference](/Automations-and-Workflows/Workflow-Action-Nodes).
***
## Undoing and Redoing Changes
While editing a workflow in **Draft mode**, you can undo and redo changes using the controls in the canvas toolbar or keyboard shortcuts.
| Action | Mac | Windows |
| :----- | :-------------- | :--------------------------- |
| Undo | Cmd + Z | Ctrl + Z |
| Redo | Cmd + Shift + Z | Ctrl + Shift + Z or Ctrl + Y |
The undo and redo buttons in the canvas toolbar appear disabled when there is nothing left to undo or redo.
Changes tracked include: adding or deleting a step, updating a step's configuration, updating the trigger, adding or removing a connection between steps, swapping or moving steps, and cloning a step.
When you undo or redo, the builder automatically scrolls the canvas to the affected node and opens its configuration panel.
Undo/redo is only available in **Draft mode**. Switching to production view or deploying a new version clears the undo history.
***
## Using Variables
Variables let you pass data from one node to another, making your workflow dynamic and responsive to the actual records being processed.
When configuring an action node's fields, click any field to switch to **variable mode** to see all data available from earlier steps - the trigger record's fields, outputs from previous action nodes, and internal workflow values.
 ***
## Dry Running a Workflow
Use **Dry run** to simulate the workflow version you are viewing before you rely on it in production. A dry run shows the trigger data, the path the workflow would take, each step's resolved inputs and outputs, any projected external actions, and how many records would be modified.
The dry run panel is available from the workflow editor when the workflow has a trigger. It can run against a draft, the deployed production version, or an older version, depending on which version is open.
This section has **4 parts**: starting a dry run, choosing trigger inputs, reading results, and understanding what the simulation does.
### 1. Start a dry run
1. Open a workflow from [Workflows](https://app.reevo.ai/workflows).
2. Make sure the workflow has a trigger configured.
3. Click **Dry run** in the workflow editor.
4. Provide the trigger input the panel asks for.
5. Click **Run dry run**.
A dry run does not change CRM data, send emails, send Slack messages, call webhooks, or send notifications.
### 2. Trigger inputs
The dry run panel asks for different inputs depending on the workflow trigger:
| Trigger type | What you provide |
| :------------------------ | :-------------------------------------------------------------------------------------------------------------------------------------------------------------------- |
| **Record-based triggers** | Select an existing CRM record that matches the trigger object, such as an account, contact, opportunity, meeting, task, sequence enrollment, or custom object record. |
| **Webhook Received** | Enter the webhook payload, headers, and HTTP method you want Reevo to simulate. |
| **Manual run** | Enter the event payload the manual trigger should pass into the workflow. |
| **Schedule** | Run the simulation as if the schedule fired now. |
### 3. Reading dry run results
After the simulation finishes, the panel shows:
* **Simulated trigger**: the record or event data that started the simulation.
* **Trigger conditions**: whether the simulated event matches the workflow's trigger filters.
* **Projected side effects**: external actions the workflow would have taken, such as sending an email, Slack message, webhook, or notification.
* **Would modify records**: the number of records the workflow would create, update, or delete.
* **Step results**: select a step on the workflow graph to see its resolved inputs, projected output, status, and any error.
The simulation runs even when trigger conditions do not match, so you can inspect why the selected event would or would not start the workflow in production.
### 4. What dry run simulates
Dry run is designed to preview behavior without creating production side effects:
* Read, branching, compute, delay, and loop steps are simulated so downstream steps can continue.
* CRM update and sequence enrollment steps project what would happen without writing changes.
* Email, Slack, webhook, notification, and other side-effecting steps are not sent. They appear as projected side effects.
* Enrichment and research steps return representative example data instead of calling their external providers.
* Approval, external lookup, async workflow dispatch, scheduler, scoring, and Ask Reevo steps are marked **Not simulated** when their real behavior cannot be reproduced offline.
AI-powered steps, including LLM and clean-and-transform steps, run with a real model during dry runs and consume credits.
***
## Deploying and Activating Your Workflow
### Deploy
When your workflow is configured and the Deploy Checklist shows all items complete, click **Deploy** to publish your changes.
* All nodes must be connected and fully configured to deploy
* To make changes after deployment, switch to **Draft mode** first, then click **Deploy** again to push the update live
***
## Dry Running a Workflow
Use **Dry run** to simulate the workflow version you are viewing before you rely on it in production. A dry run shows the trigger data, the path the workflow would take, each step's resolved inputs and outputs, any projected external actions, and how many records would be modified.
The dry run panel is available from the workflow editor when the workflow has a trigger. It can run against a draft, the deployed production version, or an older version, depending on which version is open.
This section has **4 parts**: starting a dry run, choosing trigger inputs, reading results, and understanding what the simulation does.
### 1. Start a dry run
1. Open a workflow from [Workflows](https://app.reevo.ai/workflows).
2. Make sure the workflow has a trigger configured.
3. Click **Dry run** in the workflow editor.
4. Provide the trigger input the panel asks for.
5. Click **Run dry run**.
A dry run does not change CRM data, send emails, send Slack messages, call webhooks, or send notifications.
### 2. Trigger inputs
The dry run panel asks for different inputs depending on the workflow trigger:
| Trigger type | What you provide |
| :------------------------ | :-------------------------------------------------------------------------------------------------------------------------------------------------------------------- |
| **Record-based triggers** | Select an existing CRM record that matches the trigger object, such as an account, contact, opportunity, meeting, task, sequence enrollment, or custom object record. |
| **Webhook Received** | Enter the webhook payload, headers, and HTTP method you want Reevo to simulate. |
| **Manual run** | Enter the event payload the manual trigger should pass into the workflow. |
| **Schedule** | Run the simulation as if the schedule fired now. |
### 3. Reading dry run results
After the simulation finishes, the panel shows:
* **Simulated trigger**: the record or event data that started the simulation.
* **Trigger conditions**: whether the simulated event matches the workflow's trigger filters.
* **Projected side effects**: external actions the workflow would have taken, such as sending an email, Slack message, webhook, or notification.
* **Would modify records**: the number of records the workflow would create, update, or delete.
* **Step results**: select a step on the workflow graph to see its resolved inputs, projected output, status, and any error.
The simulation runs even when trigger conditions do not match, so you can inspect why the selected event would or would not start the workflow in production.
### 4. What dry run simulates
Dry run is designed to preview behavior without creating production side effects:
* Read, branching, compute, delay, and loop steps are simulated so downstream steps can continue.
* CRM update and sequence enrollment steps project what would happen without writing changes.
* Email, Slack, webhook, notification, and other side-effecting steps are not sent. They appear as projected side effects.
* Enrichment and research steps return representative example data instead of calling their external providers.
* Approval, external lookup, async workflow dispatch, scheduler, scoring, and Ask Reevo steps are marked **Not simulated** when their real behavior cannot be reproduced offline.
AI-powered steps, including LLM and clean-and-transform steps, run with a real model during dry runs and consume credits.
***
## Deploying and Activating Your Workflow
### Deploy
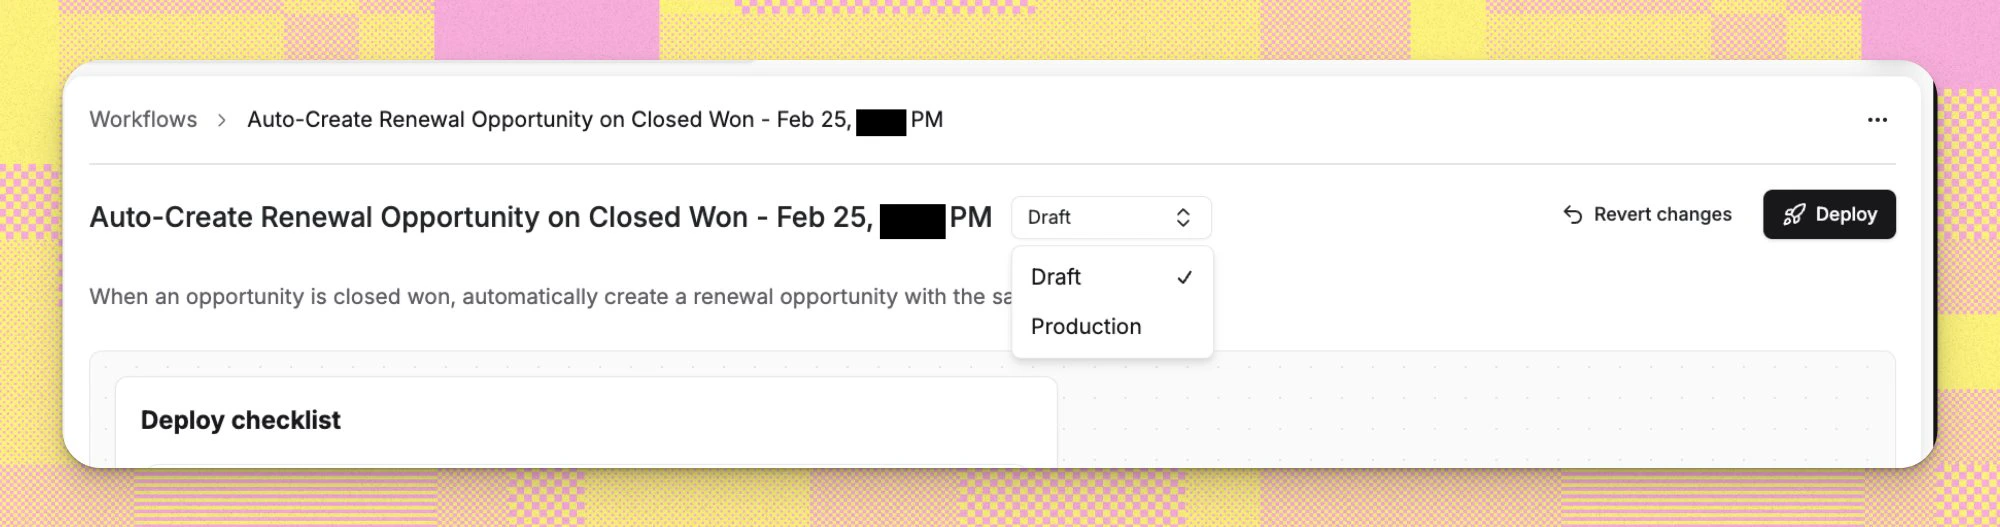
When your workflow is configured and the Deploy Checklist shows all items complete, click **Deploy** to publish your changes.
* All nodes must be connected and fully configured to deploy
* To make changes after deployment, switch to **Draft mode** first, then click **Deploy** again to push the update live
 ### Activate
After deploying, use the **Active / Inactive** toggle to turn the workflow on or off:
| Status | Behavior |
| :----------- | :----------------------------------------------------------------- |
| **Active** | The workflow fires automatically whenever the trigger event occurs |
| **Inactive** | The workflow does not fire, even if the trigger event occurs |
A workflow can be Deployed but Inactive. Make sure both the workflow is deployed **and** the toggle is Active before expecting it to run automatically.
***
## Monitoring Workflow Performance
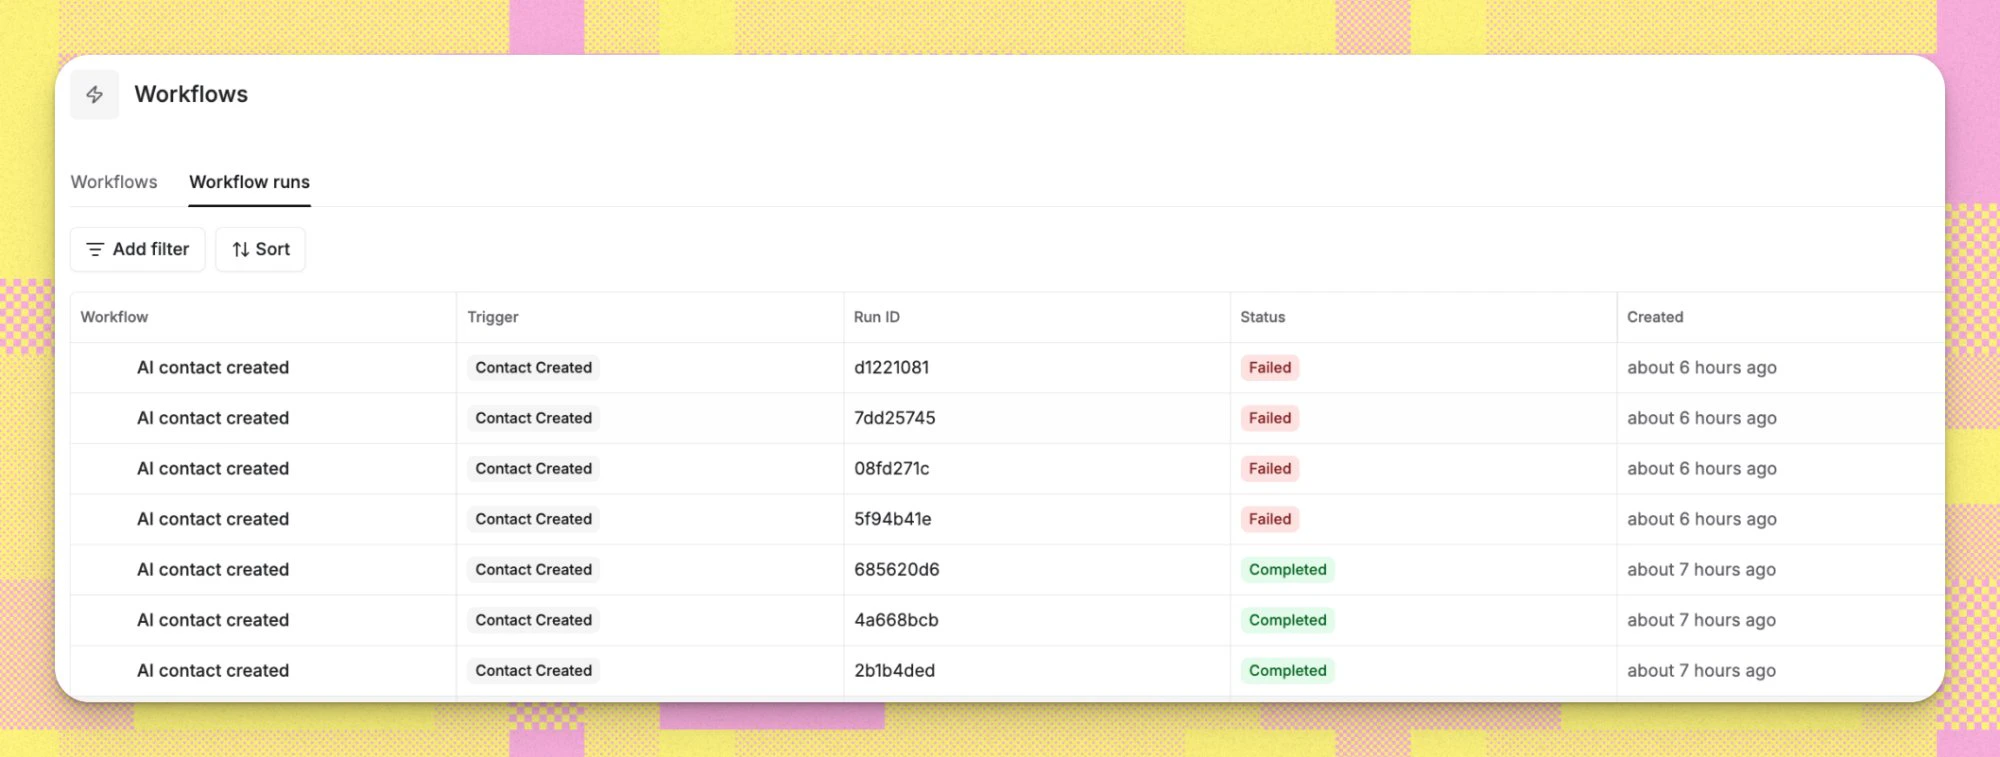
Monitor all your workflows from the main Workflows page. From the main Runs tab, clicking a workflow name or row navigates you directly into that workflow's **Run History** tab, where you can see every execution - when it ran, whether it succeeded, and a node-by-node breakdown.
### Activate
After deploying, use the **Active / Inactive** toggle to turn the workflow on or off:
| Status | Behavior |
| :----------- | :----------------------------------------------------------------- |
| **Active** | The workflow fires automatically whenever the trigger event occurs |
| **Inactive** | The workflow does not fire, even if the trigger event occurs |
A workflow can be Deployed but Inactive. Make sure both the workflow is deployed **and** the toggle is Active before expecting it to run automatically.
***
## Monitoring Workflow Performance
Monitor all your workflows from the main Workflows page. From the main Runs tab, clicking a workflow name or row navigates you directly into that workflow's **Run History** tab, where you can see every execution - when it ran, whether it succeeded, and a node-by-node breakdown.
 For a complete guide to reading run history and resolving errors, see [Workflow Troubleshooting & Run History](/Automations-and-Workflows/Workflow-Troubleshooting).
***
## Troubleshooting / FAQs
Click the **Deploy Checklist** panel to see exactly which fields still need to be completed. All nodes must be connected and every required field must be filled in. The most common blocker is an unconfigured node or a disconnected node with no incoming connection.
**Static values** are fixed data you type in or select directly - like a specific email address, a hardcoded stage name, or a particular value in a select list (e.g. choosing a particular opportunity stage). **Variables** pull live data from earlier steps in the workflow - like the email address from the contact that triggered the run. Variables make workflows dynamic and reusable across many records.
Switch to **Draft mode** first to make your edits. The currently active version keeps running until you click **Deploy** again - in-progress runs are not affected.
Confirm that: (1) the workflow has been **Deployed** (not just saved), (2) the **Active** toggle is on, and (3) the trigger's conditions are actually being met. For Record Updated triggers, the specific field and value you configured must change on a record for the trigger to fire.
Yes - you can delete any nodes in your workflow. Note that deleting a node can break variables in downstream nodes that reference it, and those references will need to be updated.
Yes - use Cmd+Z (Mac) or Ctrl+Z (Windows) to undo, and Cmd+Shift+Z or Ctrl+Y to redo. You can also use the undo/redo buttons in the canvas toolbar. Undo/redo is only available in Draft mode and tracks actions like adding or deleting steps, updating configurations, and moving or swapping nodes.
Yes. Open the workflow version you want to test and click **Dry run**. Reevo simulates the workflow against the trigger input you provide and shows the path, step outputs, projected side effects, and projected record changes without sending messages, calling webhooks, or changing CRM data.
AI-powered steps run with a real model during dry runs so the output is realistic. Those AI steps consume credits just like they do during a live workflow run.
Yes - click **Swap** at the bottom of the editor to choose two nodes to swap locations. You can also hover near the left edge of a node to drag and drop it to a different position in the workflow.
Yes - from the workflow list, find the workflow you want to copy and click **Clone**. This creates a new draft workflow with the same structure and configuration, which you can then customize independently.
> Still have questions? [Sign in](https://app.reevo.ai) and use Ask Reevo for instant answers or to raise a support ticket.
For a complete guide to reading run history and resolving errors, see [Workflow Troubleshooting & Run History](/Automations-and-Workflows/Workflow-Troubleshooting).
***
## Troubleshooting / FAQs
Click the **Deploy Checklist** panel to see exactly which fields still need to be completed. All nodes must be connected and every required field must be filled in. The most common blocker is an unconfigured node or a disconnected node with no incoming connection.
**Static values** are fixed data you type in or select directly - like a specific email address, a hardcoded stage name, or a particular value in a select list (e.g. choosing a particular opportunity stage). **Variables** pull live data from earlier steps in the workflow - like the email address from the contact that triggered the run. Variables make workflows dynamic and reusable across many records.
Switch to **Draft mode** first to make your edits. The currently active version keeps running until you click **Deploy** again - in-progress runs are not affected.
Confirm that: (1) the workflow has been **Deployed** (not just saved), (2) the **Active** toggle is on, and (3) the trigger's conditions are actually being met. For Record Updated triggers, the specific field and value you configured must change on a record for the trigger to fire.
Yes - you can delete any nodes in your workflow. Note that deleting a node can break variables in downstream nodes that reference it, and those references will need to be updated.
Yes - use Cmd+Z (Mac) or Ctrl+Z (Windows) to undo, and Cmd+Shift+Z or Ctrl+Y to redo. You can also use the undo/redo buttons in the canvas toolbar. Undo/redo is only available in Draft mode and tracks actions like adding or deleting steps, updating configurations, and moving or swapping nodes.
Yes. Open the workflow version you want to test and click **Dry run**. Reevo simulates the workflow against the trigger input you provide and shows the path, step outputs, projected side effects, and projected record changes without sending messages, calling webhooks, or changing CRM data.
AI-powered steps run with a real model during dry runs so the output is realistic. Those AI steps consume credits just like they do during a live workflow run.
Yes - click **Swap** at the bottom of the editor to choose two nodes to swap locations. You can also hover near the left edge of a node to drag and drop it to a different position in the workflow.
Yes - from the workflow list, find the workflow you want to copy and click **Clone**. This creates a new draft workflow with the same structure and configuration, which you can then customize independently.
> Still have questions? [Sign in](https://app.reevo.ai) and use Ask Reevo for instant answers or to raise a support ticket.